Monday, 24 December 2012

Christmas Update

Merry Christmas everyone! Just wanted to stop in and leave a post so that no one thinks we've perished in some Christmas ice cream related accident - tears have been shed, but no blood so we're all good. I'm not sure if we will post every day this week as Philip is off work and it has been deemed family time, but we'll see what we can do! Definitely have a lot to share in relation to our homemade ice creams, some DIY Christmas gifts we made for each other, and some more bedroom updates! 

In case you missed it, you can also read the Christmas card that was shared in a belated Phriday Filip (still the best name for it) this Saturday.

Thanks again for taking the time to read our blog each day, we've been overwhelmed with how many reads we've been getting every day and are so thankful to you for making us a part of your day. God bless you as you remember the birth of his son, and take the time to enjoy your loved ones this holiday season, 

Merry Christmas! (I think I've said this a bunch of times in this post...but what can I say, it's festive).  

A sneak peek at our Christmas tree to keep you occupied:


Christmas Tree 2012

Saturday, 22 December 2012

Here from us for Christmas time...

Our year-in-review, written in rhyme! 
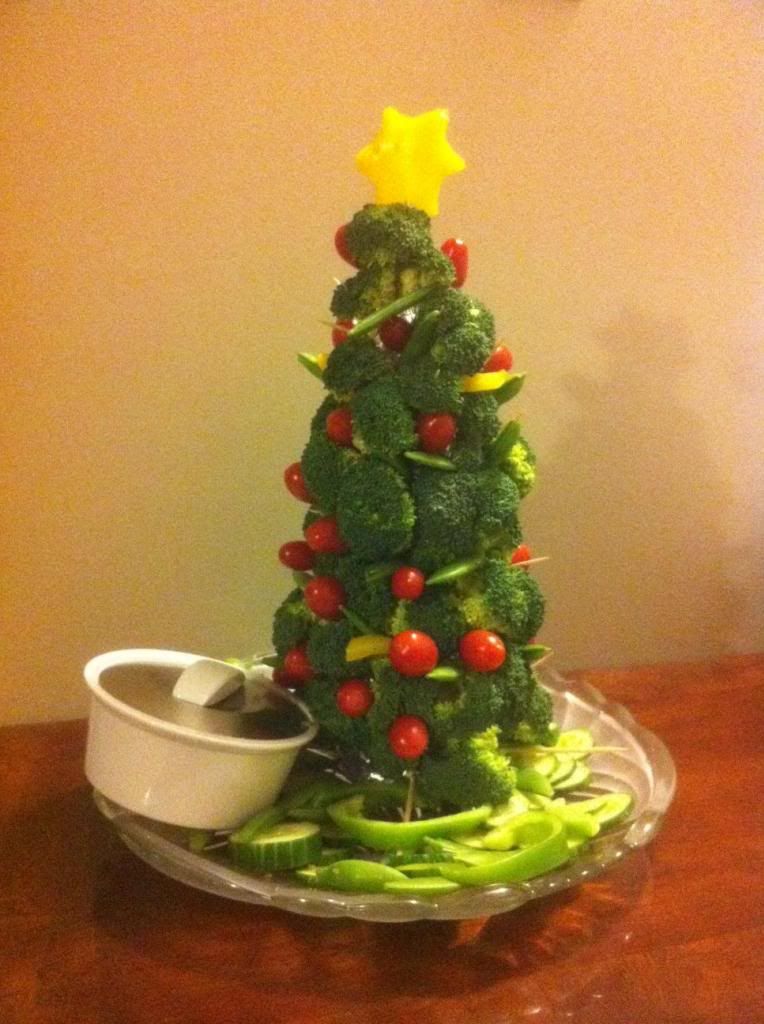
Nothing says Merry Christmas like a veggie platter shaped like a Christmas tree!
Merry Christmas! It is that time of year
to think of the ones we hold most dear.
And since all of you we don't often see,
here's a warm letter from Cass and me!

Tho' some of you may or may not care,
our year in review we'd like to share.
We're simply here to inform and to bring mirth;
our rhymes are no challenge to Frost or Wordsworth.

A lot happened in 2012,
so without more ado, in we delve!

January found us tucked safe and neat
in our condo, with new kitchen complete!
Yet loved still more given winter's barrage,
was the heated underground parking garage.

In February we beat deep winter's blues
by casting off on our honeymoon cruise!
Seven Caribbean days can't be beat,
working out lots to offset "all-you-can-eat."

Cass, with a random other cruise ship in the background.
In March Cass finally got to retire
to pursue many a goal and desire;
As you'll see she's had plenty to do
besides trademarking the phrase "Freedom 22."

In May every year we get carried away
feting 5 family births and Mother's Day!
With all that cake I'd say it's like heaven
but I'm watchin' my weight, now that I'm 27!

July we decided that the time had come
to leave our comfy nest and grow up some.
A condo's a great carefree first home,
but we wanted a house to call our own.
Selling our condo was a hard step, but a step in the direction of growing up.
 We hunted through the homes MLS lists,
and bid on a house, by a lot we did miss!
So on this humble place we also bid low,
And behold, we're owners of this cute bungalow.
Our new baby which, if you read this blog, you're pretty familiar with already.
Before possession we took
We could not overlook
Cassy's twenty-third birthday;
they grow up so fast, don't they?

The newly-minted 23-year old (in a picture from when she was still 22)
And on July 30th we got the key
to our own little house on the prairie.
But before we could get settled down
My parents took us to a much bigger town.

We drove to Chicago, them and us,
to see the Summit live at the start of August.
As well as the few days we had to sightsee,
there we celebrated our first anniversary.

Philip at historic Wrigley Field in Chicago
Immediately upon our return
Our minds did dream and our stomachs churn
At the thought of all we had on our plate
For our house to properly renovate.

In September Cass was back teaching Sunday School,
and we were both learning each hammer and tool,
As we demolished our basement and broke the bank,

Another pricy job as every homeowner knows
Is replacing your old drafty windows.
We had that done too and now hope we will
save a little on our Hydro bill.

With the work was keeping us far from bored,
we wanted a better way our memories to record
from the tough jobs through which we had to slog
so in October we started our very own blog.

you'll find all the words and photos we can share.
Cass updates it each and every day
so leave your thoughts in the comments or just say "hey!"


With November's arrival came another big move;
one of which I did not wholeheartedly approve.
My company moved to the whole other side
of our city, resulting in quite a bus ride!

But now that I'm used to it I hardly mind;
it's a great place to get writing done, I find.
In fact, as you reading this letter to you,
you've seen the benefits of the bus ride too.

But November's highlight by a fair sight
was the glorious afternoon and night
when my brother, Jonathan, filled with pride,
married Jennifer, his beautiful bride.
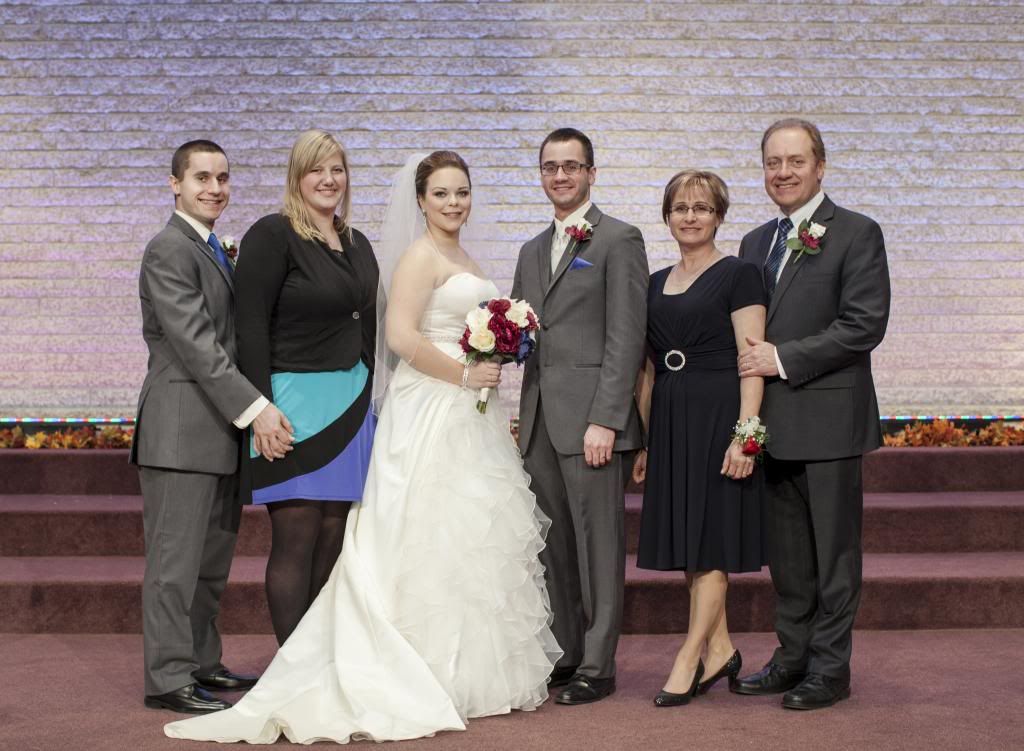
The Wiebe family at Jonathan & Jennifer's Wedding

December arrived with great fanfare,
Christmas events galore left us with little time to spare,
but with the painting and trimming in the past,
we moved into our master bedroom at last.

This time of year gives all a chance to reflect,
on the blessings we've been lucky to collect.
Like Federated Insurance and a biweekly paycheque
and the coworkers who make it fun in every respect.

Or the family and friends who in our lives share
whom we love and for whom we care.
We rely on you a lot, we hope we're not a pain,
thanks for keeping us from going insane.

And finally to God and the birth of a boy
who is the source of this season's joy;
who brings meaning to every single day,
and whose faithfulness never does sway.

So now that was our year, I hope you've been,
entertained by what you've read and seen.
Here's to the joys we hope to share with you between
now and the end of 2013!

Philip & Cassondra, a self-portrait, 2012

Thursday, 20 December 2012

A Productive Weekend: Part Three

You've heard about our closet, you've heard about our Christmas tree, that would have been enough for  a weekend, but we weren't done. 

Part Three: The Curtains


When I wrote out all the parts for this, I put curtains in...but thinking back, I'm pretty sure we didn't finish them last weekend. This is why I need to write posts right when things happen (to put things in perspective the weekend I'm referring to was the 7th-9th). We did start them that weekend though, so I guess it's not too much cheating.

On Friday night when Philip was working on the closet, and Philip's mom and I were setting up the Christmas tree, Philip's dad tried to start on the curtains.

We had great teamwork going on. 

Unfortunately, we did not have the right hardware going on. 

We realized that we hadn't bought the right Ikea brackets, so there wasn't anything we could do at that point.

The curtain story continues on Monday, when I picked up Philip (who now works a block in view of the new Ikea) and we made a pit-stop at Ikea for the correct brackets.

Here is the list of products we used (all from Ikea):


Aina Curtains
Lill Sheers

I am in love with these finials - you can rearrange them to make different patterns...and if we get tired of them I could see painting them different colours for a baby room or something. 

That doesn't include the curtain rods and such which are a bit more boring.

We were able to mount the curtains - after a couple of extra stops at Ikea for the new brackets, then a third bracket after realizing two wouldn't be enough, and a second curtain rod so that we could do a double rod system.


Brackets are up - not the most interesting photo, but it was a progress picture at least. 

They look great! One of the best things is the fact that we have two sets of curtains, it looks so much grander and more expensive, but the second set of curtains including rods and brackets and everything only cost us an additional $13. That is money well invested my friends.


Curtains are successfully up!
I love how the curtains match the lamps (even though I'm not a fan of the word "matching"), and the sheers really add something I think. Can't wait to see the room coming together completely.

All that's left to tell you about is putting the bed together, and the magnificent light fixture. Soon there will be a big bedroom reveal!

Anyone else doing bedroom renovations? Made any exciting Ikea purchases? Beat our record of 4 times to Ikea in the last month?

Wednesday, 19 December 2012

A Productive Weekend - Part Two

On Monday, I wrote Part One of the story of our last weekend, which was epic to say the least. You can read about our closet shelving installation here, so that you're all caught up for today.

Part Two: The Christmas Tree


While Philip and his dad solved the closet issues we were having, Philip's mom and I decided to set up the fake tree I inherited from someone in my family (it's still under debate - I think it might have been my aunt's and she gave it to my Oma who then gave it to me). I have never had a fake tree, and neither has my mother-in-law, so we were sort of in the dark as to how to best put it together. 


We got through it, despite initially  missing the middle portion...a pretty important segment. It looked ridiculous, just a top and base, and neither of us having seen the tree set up before were very confused at first. I ended up finding it in the garage, and we got it put together easy enough. 


Then came the lights.

My father-in-law is usually in charge of the lights, and so we were both pretty clueless. My parents had given me their old Christmas lights, and luckily they're clear which is definitely my favourite. I had already retrieved the ornaments from downstairs and set them aside a couple weeks before when we were moving things around, so that part was easy enough. The only problem is that there are only 3 or 4 ornaments of Philip's, and the rest of the tree is all me. I always got an ornament or two for Christmas growing up, and usually still do, so the tree is easily filled by my yearly ornaments.

The last thing was the tree topper, which we didn't have. I had thought I'd just go the next time I was out and get one, but my mother-in-law and I decided that we should just power through. We went to Superstore, which is open 24/7 and it was 1 AM at this point. I picked out a beautiful star tree topper (even though I've always had an angel and so a star feels somewhat pagan - but Philip keeps reminding me of the star in the Bible story), and this one even lights up. It has kind of a rustic vibe with the collection of children's ornaments, the glittery star at the top, and so as a tree skirt I wrapped a cream coloured afghan around that my Oma knit for me. It looks really cute! 


Our First Married Christmas Tree!
So that was the second task we completed last Friday night. It involved some serious tree branch fiddling, some reminiscing, and a 1 AM trip to Superstore for a light up star tree topper (which has now gone on sale for half price I noticed yesterday). 

Does anyone else feel weird changing their tree-topper-traditions (alliteration ftw)? Did your mom give you all your childhood ornaments so that she could start fresh with beautiful matching ones like she's always wanted?

Tuesday, 18 December 2012

Our Favourite Holiday Treats

Yum, we love a food poll almost as much as we love holiday food. Philip is a huge dessert guy (although maybe not as much as his brother Jonathan - they'll have to have a head-to-head sometime), and I love the different foods we get to eat at this time of year, learning a new recipe to share with family and friends is always great.

My mouth is watering as I think about it all! Only one food was not so loved in this week's poll, and that was fruit cake. I can't defend it or side with you, I've never tried it, maybe this year I'll give it a go (but probably not).

I don't even know which food to choose as my favourite, I think I might have to go with egg nog. I haven't bought any yet this year, holding out until the week of Christmas just so we don't drink too much of it as it's certainly not the healthiest of beverages.

One of our favourite foods to craft at Christmas time, a tradition we started last year was making homemade Christmas flavoured ice creams in our ice cream maker. We thought they would make nice gifts for some of the acquaintances that you'd like to give a little something to.

They are worth the judgmental looks and inner shame that I feel every time buying whole milk and heavy cream in large quantities to make these tasty treats.

Mm homemade ice cream

Last year we made egg nog, gingerbread, peppermint, reindeer (chocolate with cherry noses in it), and Bethlehem Sky (blueberry with yellow stars). They were a bit hit, my favourite probably being egg nog. This year we're in charge of dessert at our Wiebe family gathering so we're planning to make 4 or 5 kinds again to share with our relatives.

We're thinking of making:


  • Egg Nog again - it's a classic for this time of year
  • Salted Caramel - we tried it at Thanksgiving and it might be my favourite homemade ice cream so far (besides rhubarb ice cream which I mentioned a while back). 
  • Sugar Cookie - a twist on the traditional cookie dough
  • Cranberry - found this recipe that sounds incredible
  • Maple Walnut Ice Cream - one of my favourite flavours to get at an ice cream shop, found this recipe when looking for a photo to put in this post
We might also need some accompanying treats, maybe these chocolate hazelnut tarts (my in-laws go crazy for anything hazelnut), or some classic Christmas cookies.

What are you planning to cook up this Christmas? Anyone taking on way more than us and hosting their family gathering this year? Tomorrow I'll tell you about our Christmas tree set-up, so answer our Christmas tree related poll!

Monday, 17 December 2012

A Productive Weekend - Part One

The story of last weekend is way too much of a saga to share in one post, so this week we'll share one part at a time until it's complete. 

Part One: The Closet
Part Two: The Christmas Tree
Part Three: The Curtains
Part Four: The Bed Assembly
Part Five: Anything Else I Remember Later to Add
Part Six: The Light Fixture

To provide some context, the weekend started on Thursday and ended on Sunday, included two wonderful Christmas celebrations, and less than ten total hours of sleep. We're getting too old for this. Adding this whole weekends events to the Murtaugh list

Part One: The Closet

You heard the beginning of the closet journey back here, when we purchased the necessary wire shelving supplies for the organization of our closet. We continued the project on Thursday. It started out going smoothly enough, we marked and measured all of the back clips, using some interesting leveling techniques. 

Using my Chevron Art as a straight edge for leveling.
We moved on to drilling the holes, which Philip liked a little bit too much.

My husband loves drilling way more than he should, I actually bribed him with it a bit before this, reminding him how much he loves it because he had forgotten. It was quickly remembered.

Back clips up, we moved on to the end clips, which are mounted on the side walls to hold up the shelves. This is where we started to run into trouble. It seemed there were studs there - and all of the closet mounting hardware comes with the drywall anchors attached and aren't really designed for studs. 

After trying unsuccessfully to pre-drill, hammer in a big nail, etc. etc. Philip cut off the ends of the end clip anchors so that they wouldn't flare out when the nail was hammered in, since they'd be impeded by the stud. We still couldn't get it to work, the nails were not catching to the stud. Stores were closed by this time, so we went to Philip's parents to see if they had any longer nails, but not too long! We took a couple back, and still no luck. We decided to give up for the night. 

Philip cutting off the anchors at the end of the end clips, very innovative thinking - that failed. 

Now for something a little bit mushy, one thing that made me really happy that night was that most of the time this kind of stress would make us not so happy with each other, but we were able to turn the night around and still feel loving and good about how the day went. 

Thursday came to an end.

Friday, Philip's parents came home and so we had Philip's dad come over to help us finish up the closet, hoping he'd have an idea that we didn't. 

While he went to get some screws from his house that he thought might work, Philip somehow managed to make everything he tried the day before which failed, somehow succeed. This is just one of those mysteries, I don't know what to tell you that we did differently, somehow what didn't work Thursday just worked perfectly Friday. 

Our closet was then hung. Philip went on to add the support arms, hang the shelves (an 8 foot shelf and a lower 4 foot shelf), and I was able to put some clothes in it! We still have to put up the doors and I definitely need to figure out how to organize all of our clothes still, but our evening had its first success on day 2. 

One shelf up! One to go. 


We went on to stay up until 5 AM working on some of the other parts that I've yet to tell you. Stay tuned! Anyone else installed wire shelving? Had a crazy weekend? Answer the poll tonight so tomorrow we can share our favourite Christmas foods with you, including some foods of our own creation that we're planning to make this year. 

Friday, 14 December 2012

DIY Paintings (without any paint!)


Last week in your Friday Phil, I outlined some strategy to picking artwork from my in-laws, with the caveat that we had never really put it to the test. The reason was, for most of the significant pieces of art we've acquired, we made it ourselves. I promised then to let you in on our secret of how we do that.

Now, let's be clear: I love colour and art, but am by no means an expert on painting or photography. I've heard the names Ansel Adams and Annie Liebovitz. I could recognize Whistler's Mother and that one with the melted clocks by Salvador Dali. But I am by no means an art critic or could even consider myself an aficionado.

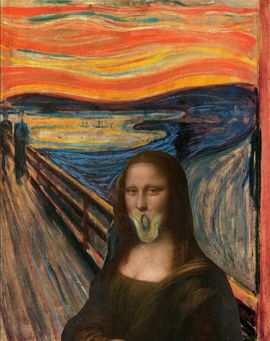
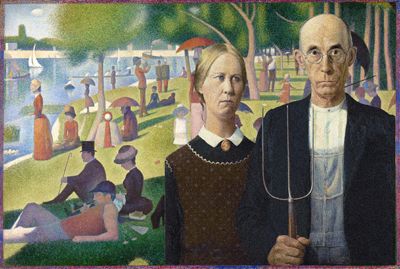
(Side note: have painters ever considered doing mash-ups like musicians sometimes do? If so, how do we not have the "Screaming Mona" or "An American Gothic in Paris"? Well, we do now! And somewhere an art historian is convulsing uncontrollably.)
Are these the only painting inspired by Linkin Park and Jay-Z's Collision Course mashup album? If so, you're welcome, art world!

But I love colour, I love art in so many forms, and I love being creative, and here's a few ways you can achieve interesting results that fit your space without breaking the bank.

Idea #1: Actually get good at painting

Watch a lot of Bob Ross. Practice with The Joy of Painting (maybe even buy the 10-DVD set!). Buy canvasses in bulk to save on per-unit costs and practice your happy little trees. (Bonus points if you get into it and grow a majestic afro.) As a result, you'll have gained a really cool new skill AND you'll have made a new friend, may he rest in peace.

Idea #2: Find somebody who's cheap and good

Commission a painting from a struggling artist or a friend who dabbles. This way allows you less control over the creative process, so make sure you have a solid discussion at the outset in which you lay out your requirements. The result is a little less DIY, but you'll get a real original piece of art and have supported the local economy and/or a friend in need.

Idea #3: Photoshop 'til you drop

The following is the strategy we promised, which we've used twice to results we're very happy with:

Step 1: Go through your art store and find an theme you like. Maybe it's a picture of a carousel, maybe it's a famous landmark in your hometown, or maybe it's morning light filtering through a hazy forest glen. 

Step 2: Search the Stock.Xchng or EveryStockPhoto for a free or cheap stock photo that suits the theme you're looking for. Pay close attention to your rights as a user of the photo, particularly if you are considering selling your work.

(Alternative to Step 1 and 2: Skip this whole bit and find a photo you've taken in the past that you love.)

Step 3: This step requires Photoshop or a comparable product, which could easily be the most expensive part of the whole process if you need to buy it. (I've seen great results for free out of GIMP, but have never used it myself.)  
Import the photo, resizing it so it's at least 300dpi and the dimensions you want for your final piece. Then, save this as a separate file to preserve your original in its pristine, untouched state. (Why do I recommend this so strongly? I couldn't provide you with the step by step instructions of what I did both times we used this process because I didn't follow this advice myself.)

Step 4: Copy the base layer and start experimenting! 
Want a painted look? Try working with the Watercolor and/or Paint Daubs. 
Want an ink drawing? There's a filter for that too.
Want to keep the photographic look, but isolate a specific colour? Photoshop's Magic Wand or Magnetic Lasso Tools are great for that. Or (spoiler alert) do what we did in the bedroom, and take a black and white photo and add colours to it that suit your room!
Be warned though; most filters don't immediately produce distinctive, original results; experiment with different foreground and background colours until you get results you like.

If you're really brave, create a new layer above your artwork, select an appropriately sized/shaped brush, and try to recreate the photo. It's a little like Paint By Numbers meets The Internet. (If you try this, I recommend creating a new layer for every colour you use.)

Step 5: Once you're happy with the look, find someone who will print "photos" on gallery-wrapped or framed canvas. Groupon used to sell coupons for a bunch of these kind of printers, but for our money, we always used Costco Photo because they were very competitively priced, offer a 36"x24" size that we wanted (most don't go that big), and we can pick it up at our local store 10 minutes away.

Show and Tell

Now, this is useless unless we show you what we did. Unfortunately we don't have the original photos we used, nor a snapshot of the "paintings" in progress; at the same time, the process of experimenting with what looks good doesn't always yield linear progress conducive to step-by-step instructions. That said, here are the final products"

Our first fake-painting using this method.

For the first piece, we were inspired by the aforementioned idea of dark tree trunks in a vivid forest. I was hoping for more of a Monet-ish painted look (i.e. a natural landscape or image but not aiming for photographic realism) so I used the Paint Daubs filter a bit, and because we wanted it to fit in our living room, I worked in the espresso browns of our living room furniture as well as the blue of our condo's living room's feature wall (now the darker blue in our office). The result hung in our dining room at our condo; we haven't decided where it'll end up in Grandpa Joe's House.

Our second, calmer fake-painting. (Actually, more of a faux-tograph perhaps?)

The second piece we did we wanted to have a more calming influence. Inspired by a photo of the aforementioned forest glen, we filtered the photo (that was originally black and white) less heavily. I added in extra mist, but apart from that, the most I did to adjust the photo was add some blurring (as much to hide pixellation of a smaller photo as anything) and added the colour to the grass and tree. The finished result will hung over the espresso fireplace in our bedroom in the condo, and when we picture that in our house, we still like that idea.

One Way to take it to a whole. 'Nother. Level.

As a final note, if there's something a gallery-wrapped canvas print lacks, it's--no, not a soul, although some "real artists" might argue that point (and who am I to refute them?). It's texture. But I saw a Thomas Kinkade 60 Minutes feature (that you can watch online) once that showed the Painter of Light in a whole new, well, light. His was a very commercial enterprise that offended many art critics who felt that art should be about creativity, not formulaic cash cow exploitation, while Kinkade's defenders used a variation of the "subjective nature of taste" argument to justify the value of his endlessly-reproduced work; I'll let you decide where you stand on that.

But one thing I saw that I've been reminded of recently is that he had a crew of people who would take prints of his work and add spots of real paint to various sections (maybe highlight the snowcapped trees with some real white paint) to add texture and increase the value of the works when sold.

Thinking about it now, why couldn't I do that to some of the prints I've made? Not to add to their monetary value per se, but to add texture and make it feel more "real." I could match some real paints to the colours in the print, grab a brush, and spread it on thick. I've stocked that idea away for a rainy day, but we'll be sure to let you know how it goes, for better or for disastrously worse!

How about you? Have you created a painting for your home and get any interesting (perhaps even Pinteresting) results?