Friday, 14 December 2012

DIY Paintings (without any paint!)


Last week in your Friday Phil, I outlined some strategy to picking artwork from my in-laws, with the caveat that we had never really put it to the test. The reason was, for most of the significant pieces of art we've acquired, we made it ourselves. I promised then to let you in on our secret of how we do that.

Now, let's be clear: I love colour and art, but am by no means an expert on painting or photography. I've heard the names Ansel Adams and Annie Liebovitz. I could recognize Whistler's Mother and that one with the melted clocks by Salvador Dali. But I am by no means an art critic or could even consider myself an aficionado.

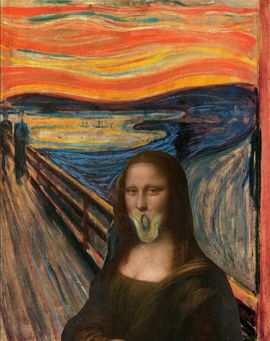
(Side note: have painters ever considered doing mash-ups like musicians sometimes do? If so, how do we not have the "Screaming Mona" or "An American Gothic in Paris"? Well, we do now! And somewhere an art historian is convulsing uncontrollably.)
Are these the only painting inspired by Linkin Park and Jay-Z's Collision Course mashup album? If so, you're welcome, art world!

But I love colour, I love art in so many forms, and I love being creative, and here's a few ways you can achieve interesting results that fit your space without breaking the bank.

Idea #1: Actually get good at painting

Watch a lot of Bob Ross. Practice with The Joy of Painting (maybe even buy the 10-DVD set!). Buy canvasses in bulk to save on per-unit costs and practice your happy little trees. (Bonus points if you get into it and grow a majestic afro.) As a result, you'll have gained a really cool new skill AND you'll have made a new friend, may he rest in peace.

Idea #2: Find somebody who's cheap and good

Commission a painting from a struggling artist or a friend who dabbles. This way allows you less control over the creative process, so make sure you have a solid discussion at the outset in which you lay out your requirements. The result is a little less DIY, but you'll get a real original piece of art and have supported the local economy and/or a friend in need.

Idea #3: Photoshop 'til you drop

The following is the strategy we promised, which we've used twice to results we're very happy with:

Step 1: Go through your art store and find an theme you like. Maybe it's a picture of a carousel, maybe it's a famous landmark in your hometown, or maybe it's morning light filtering through a hazy forest glen. 

Step 2: Search the Stock.Xchng or EveryStockPhoto for a free or cheap stock photo that suits the theme you're looking for. Pay close attention to your rights as a user of the photo, particularly if you are considering selling your work.

(Alternative to Step 1 and 2: Skip this whole bit and find a photo you've taken in the past that you love.)

Step 3: This step requires Photoshop or a comparable product, which could easily be the most expensive part of the whole process if you need to buy it. (I've seen great results for free out of GIMP, but have never used it myself.)  
Import the photo, resizing it so it's at least 300dpi and the dimensions you want for your final piece. Then, save this as a separate file to preserve your original in its pristine, untouched state. (Why do I recommend this so strongly? I couldn't provide you with the step by step instructions of what I did both times we used this process because I didn't follow this advice myself.)

Step 4: Copy the base layer and start experimenting! 
Want a painted look? Try working with the Watercolor and/or Paint Daubs. 
Want an ink drawing? There's a filter for that too.
Want to keep the photographic look, but isolate a specific colour? Photoshop's Magic Wand or Magnetic Lasso Tools are great for that. Or (spoiler alert) do what we did in the bedroom, and take a black and white photo and add colours to it that suit your room!
Be warned though; most filters don't immediately produce distinctive, original results; experiment with different foreground and background colours until you get results you like.

If you're really brave, create a new layer above your artwork, select an appropriately sized/shaped brush, and try to recreate the photo. It's a little like Paint By Numbers meets The Internet. (If you try this, I recommend creating a new layer for every colour you use.)

Step 5: Once you're happy with the look, find someone who will print "photos" on gallery-wrapped or framed canvas. Groupon used to sell coupons for a bunch of these kind of printers, but for our money, we always used Costco Photo because they were very competitively priced, offer a 36"x24" size that we wanted (most don't go that big), and we can pick it up at our local store 10 minutes away.

Show and Tell

Now, this is useless unless we show you what we did. Unfortunately we don't have the original photos we used, nor a snapshot of the "paintings" in progress; at the same time, the process of experimenting with what looks good doesn't always yield linear progress conducive to step-by-step instructions. That said, here are the final products"

Our first fake-painting using this method.

For the first piece, we were inspired by the aforementioned idea of dark tree trunks in a vivid forest. I was hoping for more of a Monet-ish painted look (i.e. a natural landscape or image but not aiming for photographic realism) so I used the Paint Daubs filter a bit, and because we wanted it to fit in our living room, I worked in the espresso browns of our living room furniture as well as the blue of our condo's living room's feature wall (now the darker blue in our office). The result hung in our dining room at our condo; we haven't decided where it'll end up in Grandpa Joe's House.

Our second, calmer fake-painting. (Actually, more of a faux-tograph perhaps?)

The second piece we did we wanted to have a more calming influence. Inspired by a photo of the aforementioned forest glen, we filtered the photo (that was originally black and white) less heavily. I added in extra mist, but apart from that, the most I did to adjust the photo was add some blurring (as much to hide pixellation of a smaller photo as anything) and added the colour to the grass and tree. The finished result will hung over the espresso fireplace in our bedroom in the condo, and when we picture that in our house, we still like that idea.

One Way to take it to a whole. 'Nother. Level.

As a final note, if there's something a gallery-wrapped canvas print lacks, it's--no, not a soul, although some "real artists" might argue that point (and who am I to refute them?). It's texture. But I saw a Thomas Kinkade 60 Minutes feature (that you can watch online) once that showed the Painter of Light in a whole new, well, light. His was a very commercial enterprise that offended many art critics who felt that art should be about creativity, not formulaic cash cow exploitation, while Kinkade's defenders used a variation of the "subjective nature of taste" argument to justify the value of his endlessly-reproduced work; I'll let you decide where you stand on that.

But one thing I saw that I've been reminded of recently is that he had a crew of people who would take prints of his work and add spots of real paint to various sections (maybe highlight the snowcapped trees with some real white paint) to add texture and increase the value of the works when sold.

Thinking about it now, why couldn't I do that to some of the prints I've made? Not to add to their monetary value per se, but to add texture and make it feel more "real." I could match some real paints to the colours in the print, grab a brush, and spread it on thick. I've stocked that idea away for a rainy day, but we'll be sure to let you know how it goes, for better or for disastrously worse!

How about you? Have you created a painting for your home and get any interesting (perhaps even Pinteresting) results?

Thursday, 13 December 2012

Learning to Blog

If there's one thing this blog has forced me to do (okay it's forced me to do a lot of things), it's probably become a bit more tech-savvy. I was always pretty good on the computer as a kid, but this is a lot more advanced at times. 

One of my goals is to improve my blog every week. When we started it was sort of on a whim and so since then we've added a lot of features including:

  • Pages like About Us, Take the Tour, and Our To-Do List
  • Weekly polls
  • Icons allowing you to follow us on Facebook, Twitter, & Pinterest
  • A blog roll showing some of the other blogs we read
  • List of popular posts with the most reads (for the record our highest ranked post so far is my very first crafting experience at 109 reads). 
  • An ever-changing banner which we're hoping to update every month.
I still have an incredibly long way to go, but I've started dabbling in Photoshop to take my iPhone photos up a notch, and hopefully I'll learn some html at some point so I can add some more features to the blog and have some freedom to customize. Maybe someday the banner will even be designed by me instead of Philip...okay that will never happen. 

Today I added a search feature to the page which allows you to search a keyword and it will find the posts that include it. This should make it easier to find that post you're looking for about our bedroom inspiration, or yard work, or learn more about how I organize my day-to-day tasks

Some other goals for the blog are to start having some guest bloggers (if anyone's interested - let me know), feature some of your houses and renovation projects, and keep up with blogging every day even when it gets tough. I'm also working on creating a page that categorizes all of our posts in an easy to find way so that you can easily see all of the posts about a certain room in our house or a certain type of project. 

We'd love to hear from you about features you'd like us to add to the blog. One thing we have to figure out is why iPhones/iPads can't comment, that's an issue. Any ideas for our January banner update? Features on other blogs that you'd like to see here as well? Let us know what you're thinking in the comments, we love to hear from you.

I try not to have any posts without pictures (add that to the list of goals) so I went on a hunt for a relevant joke/comic to add here...this is so unrelated, but it made me laugh so here goes. 


Another goal: all pictures should have captions. 

Wednesday, 12 December 2012

Trim: Finishing Touches

The trick to getting trim to look great is all in the finishing. It requires a lot of patience and a keen eye for details - both of which I don't really have. Unfortunately I didn't take many pictures during this process, but I've tried to explain everything as best I can so hopefully that's still helpful to those of you who are tackling your own trim projects. 

When we last left our newly installed trim we had finished caulking, we still had some sanding, patching, priming, and painting to do. 

Sanding is probably the most important part of finishing trim, it helps to make miters perfect, as well as sanding the patchwork over nail holes. Once you've painted, it's harder to sand without paint flaking and it's definitely worth the legwork to get it right the first time. 

There are some spots I really wish I had sanded more, so I've learned my lesson for the rest of the rooms once we get to them. Sometimes when you run your hand over it, since you've sanded it you don't feel rough edges and think it's smooth, but when it still isn't perfectly level with the rest you can see it once you've painted over. 

Once the first sanding is done, you can patch with a filler, we used this product from Home Depot which is specifically meant for filling trim. It was located in the same aisle as the trim so it was convenient for us to quickly grab. You'll want to spread filler over every nail hole, as well as your miters and other gaps that you might see using a small putty knife. 


Trim Filler that we used to fill all the little nail holes. 
One tip that would help with my sanding issues above is putting the filler on very thin, scraping most of it off with your putty knife so that there is less sanding to do and the sanding will be much more effective too. Some nail holes can also be filled when you paint so that they aren't noticeable. 

Once you've patched and it dries, sand it all again! Patch, sand, repeat until you're happy with the result. 

Using a foam roller for a smooth effect and no brush strokes, prime any unfinished wood, and paint over that once it's dry. We purchased special self-leveling paint from Benjamin Moore, but it was crazy expensive so I have to admit that I would maybe try without it next time. When using a foam roller it turns out smooth anyway, and the spots where we did use a brush like in door jams we can see some brush strokes still (although who knows, maybe they'd be a lot worse without the special paint). If you're interested in self-leveling paint we used Benjamin Moore Advance paint which has great leveling properties. 

Self-leveling paint, it was about $75 for a gallon. 
Once it's all dry you can consider yourself done! I love our new white trim, it is beautiful. I'm a total sucker for white, as a kid my favourite colour was even white because you could colour on it. The same principles still apply, white allows the other colours to pop! 

We're almost done these two rooms, and they're looking beautiful! Anyone have any tips for finishing trim? What projects are you working on when you should be Christmas shopping (seriously - time is ticking and we have a lot of gifts left to buy)? 

Tuesday, 11 December 2012

What We Want for Christmas

This past week, we asked what you wanted for Christmas. A majority actually wanted practical things, which is surprising, and certainly is not how Philip makes his Christmas list most of the time. I do like things of a more practical nature, but prefer if they're things I may not have bought myself or didn't want to spend the money on.

This Christmas, we're definitely hoping for some practical items as we've been dropping a lot of money lately and every little thing helps! Some tools for Philip would be great as we've been borrowing a lot of them from our parents, and any decor items are top on my list so we can keep accessorizing this place!

Now, on to our Christmas lists! 


Cassondra 3 Christmas Wishes

I have a lot of trouble making Christmas lists, my mom never bought us things off of them so putting things on a list was basically asking to not get those things. She always gets us amazing gifts, just thinks of them herself. So from there stems my aversion to Christmas list making. I did make a list this year, but I can't even think of how to rank them. 

1. Personalized Artwork


One of the projects I'm really excited about in this house is getting more personalized artwork up, I really want our house to be ours and show all the things we love. Philip is handy at computer artwork and things like that, so we'll probably end up making a lot of our own, but here are some artwork pieces that have really been inspiring me lately!


Jenna Sue Design will create a custom sketch of your house! 


This personalized love art totally floats my boat, from Silhouette Blue
2. Raclette
At Philip's parents house on New Years Day we always have Raclette. It's a great tradition and I love that kind of eating, where you sit around talking eating a bit at a time, sort of like fondue. I'm hoping to get my own someday soon so we can invite friends over and enjoy that tradition on more than the first day of the 2013. 

You melt cheese on the bottom and then put it over the grilled potatoes, meat, etc. 

3. Tickets to Something/Going Out Gifts

Since working on the house has taken up a lot of our extra cash, one of the gifts that I appreciate is restaurant gift cards, tickets to an event, etc. that Philip and I can enjoy without worrying about our wallets. We've definitely been low on date nights and so a night out is always a great treat.


Philip's 3 Christmas Wishes

In our relationship, Cassondra is definitely the Chief Listmaker. Her lists have lists. (“The 5 Lists in my Purse Right Now.” “The 8 Best Things About Lists.” “212 Ways I will get revenge on Philip for making fun of my love of lists on the blog.”) But at Christmastime, I take the lead.

In my family, my Christmas List is an annual event. I typically put an inordinate amount of time into them, cataloguing items by category, listing prices and places where you can purchase the items, and even theming the lists. (Most memorable was the Da Vinci Code-themed list from 2007.) I go beyond the typical list and research, catalogue, curate, and publish a veritable Christmas buying guide for me.

And then, this year, I scaled back. There are categories, but it’s all straightforward. There are no prices. No Amazon links. Just the basics. I grew up found a new passion, my very own castle to manage, repair, and upgrade.

But that doesn’t mean I didn’t submit a list. Oh no. Can’t leave something as important as my Christmas gifts up to chance. So without further ado, these are the top 3 things I asked for, in countdown fashion:

3. Sunglasses

If you’ve ever met me in the summertime, you’ve seen my sunglasses. Winnipeg is one of the sunniest cities in Canada, and for whatever reason (perhaps the Lasik I had done a few years ago?) my eyes are particularly sensitive, so I wear my sunglasses almost incessantly; if they’re not over my eyes, they’re temporarily flipped atop my head like a real cool dude poser dork (hahahaha! Revenge #1 complete. –Cass)

Problem is, the lenses on my Oakley Fives 2.0 that I Love with a capital “L” are scratched like crazy, and that model has long been discontinued. It soon will be time to send them up to the great, ummm, underside-of-a-ball-cap-visor (?) in the sky. And so as a pre-emptive strike, I’m hoping for some new shades under the tree.


Blue Like Jazz is probably my second-favourite non-fiction book of all time. (I may have a list for that too.) And I knew author Donald Miller and Steve Taylor were working on a movie of it thanks to Miller’s excellent follow up book A Million Miles in a Thousand Years (which may also be in my non-fiction top ten).

But then, the funding didn’t come through. And the film was dead.

Except it wasn’t. Thanks to two enterprising fans and Kickstarter, the movie crowdsourced over a third of a million dollars, and I was one of the contributors to that effort who thus have their names among the credits as “Associate Producers.” (I have the t-shirt to prove it.)

Only problem is, Blue Like Jazz (The Movie) never opened in theatres in my city. And so I still haven’t been able to see the movie.

And to top it all off, my favourite magazine (RELEVANT) helped promote the movie, and as such has a special edition of the movie for sale in its store with exclusive features which may or may not have Donald Miller reading snippets of Christian romance novels aloud while wearing a snuggie.

And now that you know that Movies+Donald Miller+RELEVANT Magazine=my sweet spot, and it could only be theoretically topped if the movie starred my wife and/or the Winnipeg Blue Bombers, what could possibly be #1?

1. Tools

This one’s for you, folks. Well, technically it’s for me. But as this blog has become our way of sharing this renovation process with you, it’s also for you.

So far, most of the work that we’ve done has been done with the use of the graciously-lent-and-gratefully-borrowed tools our parents or friends own. And while that can work for a while, there comes a time for a man to step up and get his own power drill and drill bits, 7¼” circular saw, random orbital sander, electronic stud finder, staple gun, and more.

This is in direct violation of my one-time distaste for practical gifts. As recently as a year or two ago, I rejected the idea of getting such items as gifts. Practical gifts didn’t send me giggling with fits of glee because I was going to have to buy them myself anyway, so unwrapping them was just preventing me from having to go to the store myself.

In fact, I still see some of the logic in that. However, something has changed.

It’s called a mortgage. They’re called bills. They’re called “not having unlimited resources with which to buy everything you might purport to need.”

So now, I’m all on the practical gift train. Tools? Yes, please! Clothes? I’ll wear ‘em with a smile! A 4-litre jug of milk? Sure, why not, I’ll pour that on my cereal. Rolls of toilet paper? Okay, let’s not get ridiculous. But you get my drift. I’m hoping that, over the next few birthdays/Christmases, I can accumulate my own personal arsenal of tools and the skills to put them to use, making Grandpa Joe’s House into everything it can be.

Share your Christmas wishlist in the comments! We'd love to get some inspiration for the birthday lists we'll soon have to make (okay not that soon). 

This week we'll ask about your favourite holiday food, you know our mouths are watering already waiting for some of the delicacies we're going to feast on. 

Monday, 10 December 2012

Floor Solutions

After we'd finished caulking the trim, we took a step back and reassessed what needed to be done to make these rooms complete. When we removed the baseboard radiators, two small circular holes remained in the floor where the pipes ran. 

My dad had the idea to cut some oak doweling to fit the holes and fit it in to make it less noticeable. At some point we may need to replace the floor, or refinish it at least, but for now this just makes things more livable.


Pretty rotten still, but no more major hole.

We bought some oak doweling at Home Depot (something like this) for a couple of bucks, and cut a small disc off. We still have a lot of doweling left for the remaining rooms once we get to them. It definitely worked to plug the holes, but there was still a lot of rot around where the holes were. We puttied over the holes and a bit around where the rot was in order to try and match the colour of the floor a bit better (the rot was pretty blackened and a bit of an eye sore). Once the putty was dry, we sanded and did one more coat. It definitely still didn't match, but it looked less rotten. 


The wood putty recommended wearing a mask and safety glasses...seemed a bit like overkill,
but Philip is nothing without safety.

Finished puttying, definitely not a match but we're getting somewhere.

Since we were working on floors anyway, we also decided to tackle the darkened ridge all the way around both rooms. The previous homeowner (Grandpa Joe) had quarter round in addition to the baseboards, so his trim was quite a bit thicker than the new trim we installed. He had refinished the floor once before and our guess is that the trim wasn't removed when that happened, because the floor under the trim was a slightly different height, and a bit of a different texture because it wasn't refinished and nice and smooth. The rough texture it had also attracted a lot of dust making it really dark and gross. 


Dark border around the room, another idea we had was to stain the whole border of the room a mocha colour in order to just embrace what was already happening.


At some point we may need to add quarter round to our trim in order to cover it up a bit better, but for now we've come up with a temporary fix until we know if we need to replace the floors down the line or not (this will be revealed by whether or not we encounter floor gaps that are impossible to fill when we move some walls around). We sanded all the way around the room with a belt sander to smooth the surface. 


Sanding Sanding. Almost ready to have a dust free home after all of this. 


After that, we went around the room with a finishing product that gives the floor a bit of oak colour, and seals it at the same time. We just rubbed it on with a cloth (in this case an old pair of underwear which looked super disgusting at the end). 


These underwear provided a lot of laughs, if you ever want a day off work just say that you're sick and send this picture, no questions will be asked.

We ended up doing two coats in both rooms, and it's still a bit noticeable but definitely not the eye sore it started out being. As furniture gets added, and as the patched holes are below the window on both sides exactly where curtains will hang, it will definitely start to be more camouflaged. 


Before
After
Anyone else been tackling floor projects lately? Have any suggestions for us besides put a rug over those holes? Our room is definitely starting to look great! Another update, today when we got home from Ikea (for the 4th time - keep forgetting things!), our garage didn't open...need to investigate a bit more but hopefully it won't be too expensive a fix. Wish us luck! Tomorrow we'll provide poll results so get your vote in!